Add Branch
Adding Branches to the System Can be Done as follows:
1. Go to the Branch.
2. Click + Add Branch, then fill in the information in the respective fields.

Branch
The Branch tab consists of a number of items to be filled in:
- Branch Name: Enter the branch name.
- Company: Select a company.
- Contact Person: Enter the contact person's name.
- Email: Enter the Contact Person's Email Address.
- Phone: Enter the Contact Person's Phone number.

Address
Fill in the branch address details as per the company registration certificate. The fields in bank consists of:
- Building Name
- Unit No.
- Floor
- House No
- Road/Street
- Sub District
- District
- City/Town
- State
- Postal Code
- Country

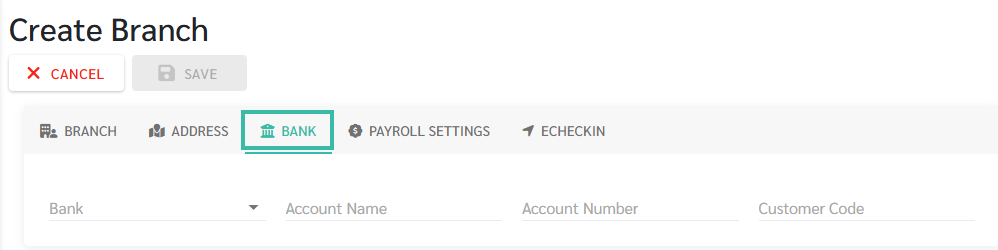
Bank
- If the company has multiple branches and salaries are paid to each branch from the same company account, only the company's bank account details need to be entered in the Bank section. It is not necessary to enter branch bank details.
- If the company has multiple branches and salaries for each branch are paid from their respective branch accounts, please fill in the bank account details for each branch at the branch tab.
- The fields in the Bank tab includes:
- Bank
- Account Name
- Account Number
-
Customer Code

Payroll Settings
- If using company-wide payroll settings, all branches within the company will have the same payroll settings. The system will automatically display the default payroll settings, which cannot be changed.
- If using branch payroll settings, the payroll settings for each branch can be different.
The items in the Branch Payroll Settings are:
- Tax Method:
- Progressive Tax Rate
- Fixed Tax Rate
- Employee Payslip Format
- Standard
- Format 1
- Salary:
- Cut Off Date
- Payment Schedule
- Payment Rule
- Reimbursement
- Cut Off Date
- Period
- Overtime
- Cut Off Date
- Period
- Allowance Rules
- Cut Off Date
- Period
- Deduction Rules
- Cut Off Date
- Period

- For further details on the Payroll Settings, refer Payroll Settings - Company & Branch.
eCheckIn
- There are two Scan options:
- GPS
- Beacon
- eCheckin Type:
- Photo
- Face Scan
- Additional Settings - Enable Remarks
-
After filling in all the sections, click Save.
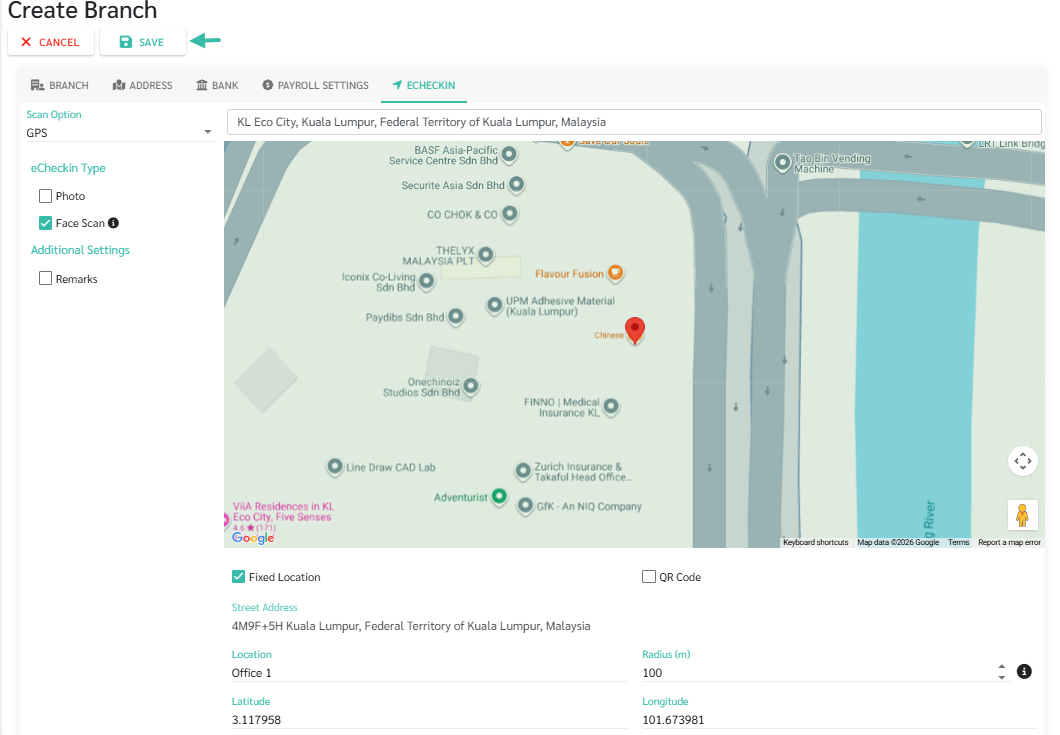

- For further details on Set eCheckin GPS Type in Branch, refer Set eCheckin GPS type in Branch
- For further details on eCheckin Face Scan Settings, refer eCheckin: Face Scan Settings